PhytoMat
Installation Guide
PhytoMats are modular sub-irrigation mats that create a reservoir beneath the planting surface and help distribute water evenly across the root zone. Each 12″ × 12″ tile connects into a continuous grid to form a unified planting base, available in two configurations: structural tiles for load-bearing applications and trim-to-fit tiles that adapt to irregular layouts and custom geometries.

One tile within the continuous PhytoMat grid — 12″ × 12″
Modular 12″ × 12″ format.
Available in Structural (load-bearing) and Trim-to-fit configurations.
Trim-to-fit tiles support in-field modification with a utility knife, shears, or electric saw.
Supports automated irrigation or manual fill systems.
Improves water distribution and reduces dry pockets.
Specifications
What's Included
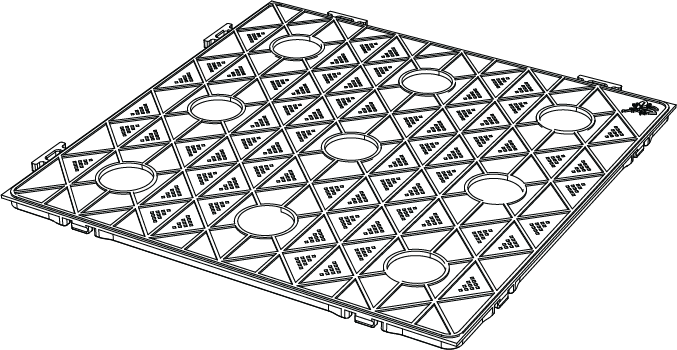
Plate Modules
Separate the soil layer from the water reservoir below. Place a wicking medium (LECA or Vulkaponic) on top to draw water upward through capillary action.
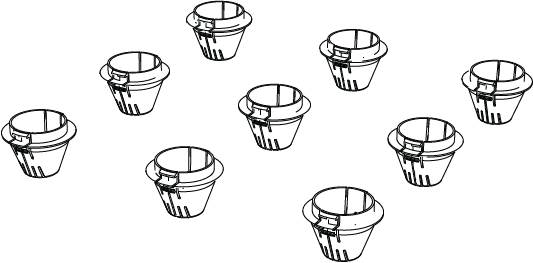
Cups
Hold the wicking medium and facilitate passive water distribution, supporting consistent capillary transfer from the reservoir to the soil layer.

Feet
Provide structural support for the modules. Attach evenly to the underside of each plate to ensure stable, level placement.
Structural Mats
Black in color. Full 12″ × 12″ squares that bear structural load up to 405 lb per square foot. Each structural mat is fully assembled using 12 feet and 9 cups.
Trim-to-Fit Mats
Green in color. Cuttable to fit custom geometries, bearing loads up to 200 lb per square foot. Trim-to-fit mats should be cut to shape first, then assembled.
Install the Mats
1. Install Structural Mats First
Begin with all Structural mats.
Assemble each mat using 9 cups and 12 feet. Use the provided foot-installation tools, or snap feet in by hand while wearing heavy gloves.
Start from the bottom-left corner and work upward row by row, following the grid layout in the drawing.
2. Install Trim-to-Fit Mats
Install after all Structural mats are placed.
Cut mats to fit as needed using shears, a box cutter, or an electric saw (recommended for large quantities).
If a full hole is cut through, install the included Cap to close the opening. Caps ship only with Trim-to-Fit sets and can be cut to any shape.
Install remaining feet and cups as required per layout, using the included tool or heavy gloves.
Work one mat type at a time. Every Structural mat must be placed and locked before any Trim-to-Fit cutting begins; trimming against an incomplete grid makes edges difficult to align.
Additional Components
Float Indicators
Install float indicators where water-level visibility is desired. For larger installations, place two or more at opposite points.
Remove a cup.
Place the bottom part, the Tube Foot, through the bottom of the mat, the same way the cup was attached.
Add the float with the inserted red indicator straw inside the connected Tube Foot.
Attach the tube to the top of the Indicator Foot.
Thread the red straw through the Indicator Cap hole.
Irrigation Inlet Tube
Each planter receives one irrigation inlet tube, placed close to the sump pump inside one of the tanks.
Place the Tube Foot through the bottom of the mat, the same way the cup was attached.
Add the tube to the top of the Tube Foot protruding through the mat.
Tie your water line from the tank into the tube.
Finish the System
1. Pre-fill System Check
Confirm all mats are installed and locked in place.
Verify all feet, cups, float indicators, and inlet tubes are correctly installed.
Ensure all plumbing and system connections are complete.
Test the system operation before proceeding.
2. Wicking Substrate Layer
Cover all PhytoMats with wicking material.
Ensure even coverage across the entire surface.
This wicking medium is required for proper system function.
3. Plant Installation
Once wicking material is installed, begin planting.
Place plants according to the planting layout, if provided.
Connect to the Water Source
With the mats laid and the inlet tubes in place, connect the reservoir to a water source. Depending on the installation, this is a pumped supply from a holding tank or a manual fill.
1. Place a Sump Pump in the Supply Tank
Set one sump pump into the holding tank feeding this planting area.
Verify the tank is clean and free of debris before powering the pump.
2. Run the Supply Line to the Irrigation Inlet Tube
Tie the pump discharge line into the irrigation inlet tube installed in the mat.
Push each connection fully into its push-to-connect fitting until seated. Incomplete connections may cause leaks.
Confirm all discharge connections are secure.
3. Wire the Pump and Water Sensor to the XYLA Relay
Plug the sump pump power cord into the leftmost output on the XYLA Relay.
Connect the liquid level sensor 3-pin connector to the XYLA Relay.
Turn on power to the XYLA Relay only after the 3-pin connector has been connected.
4. Fill the Supply and Check for Leaks
Fill the tank and monitor all fittings and lines closely for leaks.
Run the pump briefly and confirm water reaches the reservoir beneath the mats.
Where ball valves are installed between connections, verify every handle is in the OPEN position. A single closed valve will isolate the reservoir and starve the connected planting zone.
5. System Start-up
After planting is complete, run the system.
Verify irrigation flow and overall system operation.
Confirm all zones are functioning as intended.
App Setup
With the hardware installed and tested, configure irrigation flow rate and scheduling in the Biotic OS app.
1. Enter Flow Rate
In the app, go to Device › Settings › Irrigation › Edit.
For the Little Giant 1/6 HP sump pump, enter 73,815 ml/min.
2. Set Up the Timer
Go to Device › Irrigation › + to add a schedule.
On shallow-tank installations, allow time between irrigation timers so water can distribute evenly between tanks.
Each schedule has a maximum timer of 20 minutes.